Personal project [2024]
Gallery

Puss-in-Boots (left): @inflatamancersizzle, Misto (right): @helloladder, Photo: @bygfoto.cosplay

Puss-in-Boots (left): @inflatamancersizzle, Misto (right): @helloladder, Photo: @bygfoto.cosplay

Puss-in-Boots (left): @inflatamancersizzle, Misto (right): @helloladder, Photo: @bygfoto.cosplay

Puss-in-Boots (left): @inflatamancersizzle, Misto (right): @helloladder

Puss-in-Boots (left): @inflatamancersizzle, Misto (right): @helloladder

Puss-in-Boots (left): @inflatamancersizzle, Misto (right): @helloladder

Puss-in-Boots (left): @inflatamancersizzle, Misto (right): @helloladder


Concept
I knew I wanted to make some design changes from any of the previous stage costumes. First off, I thought the shape of the tail was too simple. It was ovten a basic tube with no structre that matched the other cats but seemed like it didn't match his poised and proper personality, or it would be upright but still akwardly shaped and held up with string. I also really enjoy the use of yarn for texture on characters like Deuteronomy and Gus, and wanted to use it in a similar way though without him looking as old and raggedy. Inspired by the Japanese design, I decided the lapels and cuffs of the coat would be a good place to add the yarn
The wig was commissioned from @pixie_dust_jellicle, and is one they've made before, based on the 1998 proshot. I would love to have one based on later versions, possibly with sideburns or a full beard, but at the moment I don't have the funds or energy to commission such a complex custom wig. During the process, we decided to add a little bit of blue to the wig, which they already had on hand, to match the blue I added to the coat and tail.
The arm and leg warmers were commissioned from my friend @helloladder, customized for my design. Though some versions do have fluffy spats, they're usually still made out of fur fabric, and these ones are knit like the warmers warn by the rest of the characters. They adjusted their pattern to turn the bottom of the warmer into the spats, and where the spats would normally meet the pants just switched the yarn color to black.
Tail
My first project to tackle is making the new tail. I started out with sketching the shape I wanted, nice and tall and curved, then scaled it up and cut it out of scrap fabric. I took some test photos and planned out my revisions.

First (left) and second pattern tests
I extended it about six inches and improved the shape of the curve. It's already too heavy to stay up, and will be even more so once covered in yarn, so I made plans for the structure now. I'm debating whether to use wire throughout the whole thing, or at least halfway through, which will keep it upright but possibly limit the movement. On the other hand, just tying it to my coat will allow more back-and-forth movement, but it also prefers to rest to either side instead of sticking outward properly. My current plan is to use just enough wire at the base to keep it sticking out, with a "T" shape that uses my back as a brace for structure, as well as attaching it to the back of the coat with a fishing line. I will properly sew the fishing line in, though, instead of some designs which just loop it around.

Revised tail pattern
For yarn, I raided the local second-hand craft store (ReClaim It) for all of their black yarn, and a couple balls of white, too. While I was there I discovered some lovely dark blue chenille yarn, and this gave me the idea to use blue as a highlight. I had wanted to use a little varriation in the color of the yarn wefts to create extra texture and visual interest, but wasn't sure yet if I wanted to use grey. Grey would make him look older and tattered. Blue, on the other hand, is bright and vibrant, and often black fur looks blue when a bright light shines on it. I picked up both skeins of the lovely blue chenille, and another one of a darker blue to help split the difference and make the transition.
My total yarn collection ended up with textures of all sorts; a big pile of standard black yarn in varrying weights and fiber type, some eyelash yarn, some fluffy yarn, a little bit of grey, some standard white yarn and some thicker and softer, and my two colors of blue. The next step was cutting it all down to the same length, which I do enough at this point that I have a tool just for it!
After wrapping and cutting all of the yarn I had bought, I seperated out half of the textured and colored yarn. Half of it would go to the tail, and half of it would go towards the coat. If I needed to buy more of the standard yarn I could, but I wanted the noticable textures to be evenly spaced throughout.

Piles of short yarn wefts
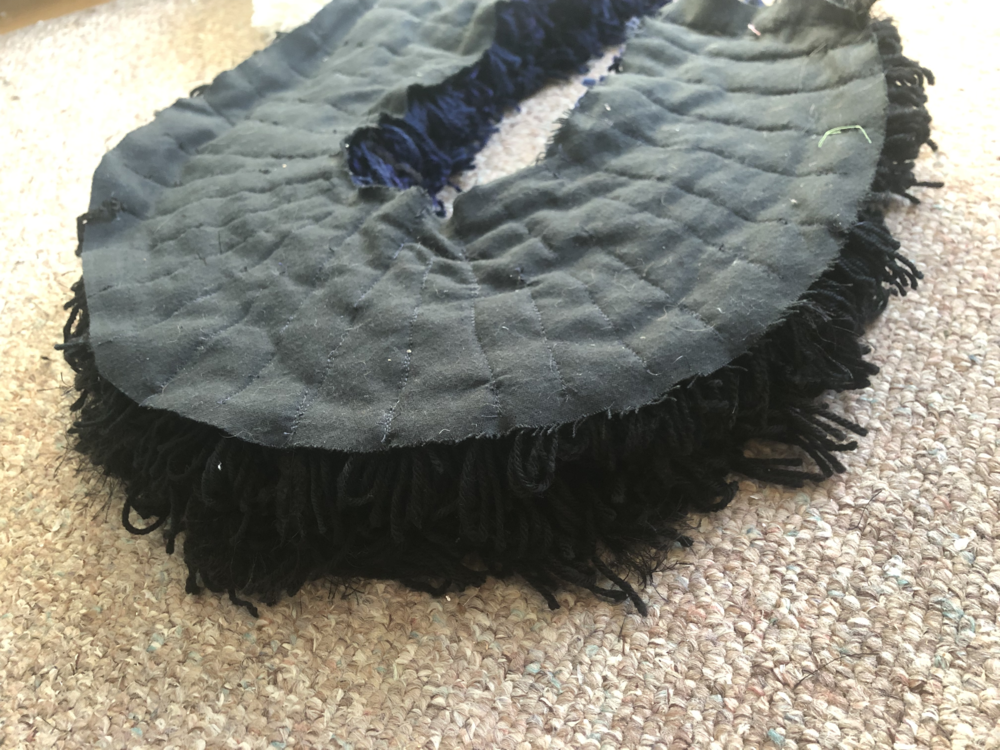
I took some strong base fabric that wouldn't stretch and prepared the base for the tail. With a white colored pencil, I marked out beforehand where I would sew the wefts, trying to follow the curve as best as I could.
Left and right tail pieces


Which meant it was now finally time to sew on the yarn. I purposefully kept each piece long, so that I could fold them in half and get a curly looped texture throughout. Working with piles of all my yarn in front of me, I carefully pick out and arrange a small bundle of varried yarns at a time.


To attach the two sides together, I pinned and machine sewed along the back. It's way too thick to sew around the full thing and turn, so after the back was attached I began hand-sewing up the inside seam from the outside.
Sandwich of yarn

Hand-sewing and stuffing as I go

Big carpet pillow
I plan on using a wire at the top of the tail for the main support, but it still tends to drift too far to either side from the weight. So, the base of the tail is getting a little help so it sticks out more perpendicularly, in the form of a wire.

Sacrified coat hanger wire

Sewing it in place to the back seam

Finishing the stuffing process
Now comes the tricky part, how to attach the extra wire to a belt in a way that is stable enough for it to actually do its job. I started off wrapping the wire in some thick felt and sewing around the wire inside until it was nice and sturdy, just to give myself something to attach to. After some experimenting I decided I'd go with what felt like the strongest elastic I had, sewn in little loops at various points along the wire base. I say "loops", but I ended up making each of these flush with the base itself, though not taut. This was a sort of estimate of how little space I could leave for the belt, and ended up being perfect. To finish it off, I sewed the tail opening closed around the edge of the base, and could finally push the belt throught the loops with some difficulty. It's very sturdy, and sits well against the base of my spine when I have the belt on tight.


With that main issue out of the way, now figure out how I was going to keep it up. I played around with some positioning, and realized I actually do like just holding it, I think the. shaping still looks natural enough. I also added a loop so it could hang around my wrist. Once the coat is finished I still plan on experienting with how the tail can attach into an upright position, but even if it doesn't work I think I have a decent second option.
Fun update: without anything tying it up, the tail was free to hang down while I wasn't holding it. This put unintentional stress on the solid curved shape of the tail and, along with the weight, eventually ripped it right as we were beggining to walk the floor of Emerald City ComicCon. It was alright though! As I was able to borrow a needle and thread and fix it up. We were more careful the rest of the day, and didn't have any more issue. But I think the pictures are kinda funny, so I'm including them.


Shirt & Cravat

Shirt with lace
In the midst of such a complicated costume, it's nice to have a simple element. A second-hand shirt and some lace from my fabric hoard make a serviceable undershirt for him, and the cravat fabric was just enough.

Cravat test with the fabric uncut

Test cut and pinned together


Back closure
I used a basic tie pattern to make the cravat, then cut it down the middle of the back where the clasp would be. My plan is to pre-tie the cravat into shape and sew it in place, so that It would be easy to take on and off. I sewed the main knot into place and added snaps to the back where it connects, but waited to gather the rest until I had the designs finished.
For the fishbone shapes on the cravat, I came up with a couple different options. My first plan was to paint them on, or more likley, make a stamp that I could use to replicate the design. While I was out and about, however, I discovered some strung sequins and the idea came to try to draw the design with them. My first tests, sewing them on, failed not miserably but weere just obnoxious enough to produce that I was not about to do it for the whole thing. As a last resort, I went against my judgement and decided to test it out with hot glue. It worked, and peer review said it wasn't terribly noticable, so I decided to do it for the rest of them. I ran out of blue sequins partway through, but the mix of blue and black honestly looks intentional since I had planned ahead and spaced them out.

Planning out sequins

A sewn sequin test

A glued sequin tesr

Glueing the rest of them
With the design finished, I could finish up the cravat by gathering up the middle and end, and sewing on a pin backing where it will attach to the shirt. Luckily, the shirt can be unbuttoned enough to take on and off with the cravat in place, so I will only have to reposition it minimally.


Shirt with finished cravat
Coat
For the coat, I used the "Hydrus Cosplay" free pattern and tutorial from Mood fabrics, which I had used previously and had some experince with. I simplified it slightly, removed the belt and the collar stand and saved the cuffs for later. The outer later is made from a short pile synthetic fur, and the lining is a dark blue corduroy found secondhand. I wanted the coat to be very thick and plush, so there's also a lyaer of quilt batting in there!

Pattern pieces cut
The extra padding proved a struggle, I had to wrestle the thing to keep it in line on the sewing mashine. Between the batting and the slippery fauz fur fabric, I realized I had to hand-baste all of the seams were there were multiple layers of both. It added a couple minutes to each seam but, I am positive, saved me much frustration in the long run.

Close-up on fur texture

Base layers sewn, but without lining
I plan on covering the lapels and cuffs of the coat in the same yarn wefts to match the tail. This meant making a pattern, sewing the wefts to an external piece of fabric, and sewing it on top of the fur. I had considered whether to make the lapels and collar of the coat out of a plain fabric to begin with, to make this process easier, but decided I didn't want to have to worry too hard about the transitions and where it would have been visible. Making it all out of fur first covers my bases.

Finished & lines coat

Patterning one half of the lapels

Two rows of yarn

6 rows of yarn
At one point in this process, I also added a little loop and hook as a closure for the front of the coat.
I filled out the lapels using the same weft technique as the tail, this time transitioning to the blue at the edge. I repeated the process on the cuffs.

A cuff with wefts sewn

One cuff pinned on

Coat test with flower
Accessories


His flower is made from half circles of red scrap fabric, cut out with pinking shears to give them an edge resembling a carnation. Each half circle is folded and sewn together at the base, then all layered and bundled into one.
Early Tests


External Links
- Wig made by @pixie_dust_jellicle
- Leg warmers and gloves made by @helloladder
- Coat pattern: The Hydrus Cosplay – Free Sewing Pattern Mood Sewciety
- Cosplay is Better with Friends - ECCC 2024 by Punished Props Academy (we appear at 1:13)
 Website template: ©repth
Background image: Texture Town
Box texture: Transparent Textures
Website template: ©repth
Background image: Texture Town
Box texture: Transparent Textures
Brooklyn Williams 2024